M5StickCを使ってトイレの照明を自動ON/OFFする
M5StickC PIR Hatを買ったので、トイレの照明を自動ON/OFFできるようにした。
以前、焦電センサとHueを使って部屋の照明を自動ON/OFFするでRaspberry Piを使って同様の仕組みを作ったが、Raspberry Piの場合は配線が剥き出しになっているため、長期間動かした際に埃がたまってしまう不安があった。
また、トイレに置き場所がないためRaspberry Piだと実現が難しかった。
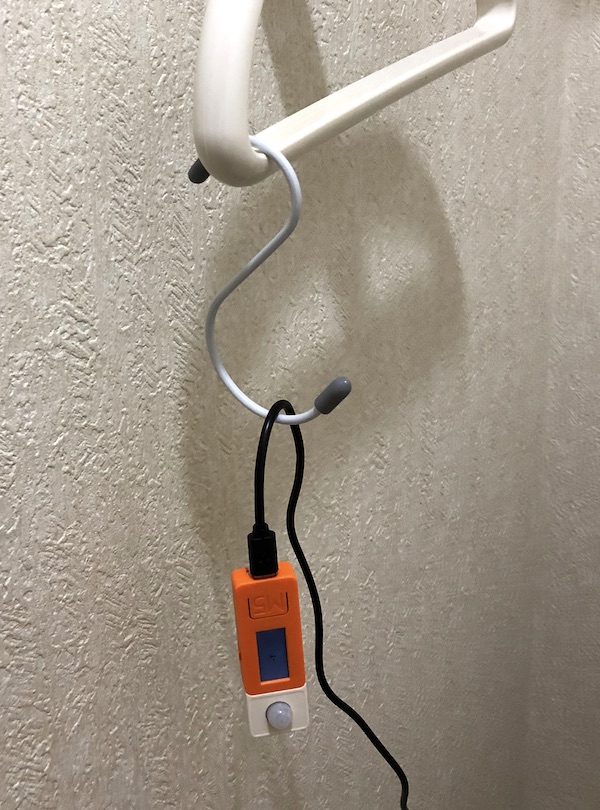
M5StickCとPIR Hatの場合はどちらもしっかりしたケースに入っている、かつコンパクトなのでトイレのタオル掛けにS字フックをつけて、そこに吊り下げるようにすれば手軽に実現できた。
実装
以前Raspberry Pi用に作ったコードをArduino用に移植した。
HueAPIへのリクエスト用にArduinoJsonをインストール
下記コードをM5StickCに書き込み
#include <M5StickC.h>
#include <HTTPClient.h>
#include <WiFi.h>
#include <ArduinoJson.h>

const char* ssid     = "SSID";
const char* password = "pass";

const int capacity = JSON_OBJECT_SIZE(3);
StaticJsonDocument<capacity> json_request;
char buffer[255];

const char *host = "http://{hue_bridge_ip}/api/{userid}/lights/{light_id}/state";
long counter = 0;

void setupWifi() {
  WiFi.begin(ssid, password);
  Serial.printf("WIFI: Connecting to %s ", ssid);
  while (WiFi.status() != WL_CONNECTED) {
    Serial.print(".");
    delay(100);
  }
  Serial.println();
}

void setup() {
  M5.begin();
  M5.Lcd.setRotation(1);
  M5.Axp.ScreenBreath(7);
  M5.Lcd.setTextColor(BLACK, WHITE);
  M5.Lcd.fillScreen(WHITE);

  Serial.begin(9600);
  while (!Serial);
  delay(100);

  setupWifi();

  pinMode(36,INPUT_PULLUP);
}

void light_off() {
  Serial.println("light_off");
  json_request["on"] = false;

  serializeJson(json_request, buffer, sizeof(buffer));

  HTTPClient http;
  http.begin(host);
  http.addHeader("Content-Type", "application/json");
  int status_code = http.PUT((uint8_t*)buffer, strlen(buffer));
  Serial.println(status_code);
  if(status_code == 200){
    Stream* resp = http.getStreamPtr();

    DynamicJsonDocument json_response(255);
    deserializeJson(json_response, *resp);

    serializeJson(json_response, Serial);
    Serial.println("");
  }
  http.end();
}

void light_on() {
  Serial.println("light_on");
  json_request["on"] = true;
  json_request["bri"] = 254;
  json_request["ct"] = 156;

  serializeJson(json_request, buffer, sizeof(buffer));

  HTTPClient http;
  http.begin(host);
  http.addHeader("Content-Type", "application/json");
  int status_code = http.PUT((uint8_t*)buffer, strlen(buffer));
  Serial.println(status_code);
  if(status_code == 200){
    Stream* resp = http.getStreamPtr();

    DynamicJsonDocument json_response(255);
    deserializeJson(json_response, *resp);

    serializeJson(json_response, Serial);
    Serial.println("");
  }
  http.end();
}

void loop() {
  M5.Lcd.fillScreen(WHITE);
  M5.Lcd.setCursor(60, 30, 4);
  M5.Lcd.println(counter);
  if (digitalRead(36) == HIGH) {
    if (counter < 0) {
      counter = 0;
    }
    counter += 1;
  } else {
    if (counter > 0) {
      counter = 0;
    }
    counter -= 1;
  }

  if (counter == -300) {
    light_off();
  }
  if (counter == 1) {
    light_on();
  }
  delay(200);
}
これでトイレの照明を自動ON/OFFできるようになったので、しばらく運用してみることにする。